
Tank Drive
Your goal is to write a program that will allow you to drive a robot with “Tank drive" (also known as "Differential Drive"), a simple but common drive system. When using a tank drive, the robot driver controls the robot with 2 joysticks, where the y-axis (vertical) of the left and right joysticks control the left and right side of the robot’s drive motors, respectively.
You can watch a small, two-wheeled example of tank drive here.
When using two joysticks to control a tank drive robot:
- To go forward, push both sticks forward
- To turn left, push the left stick backwards and the right stick forward
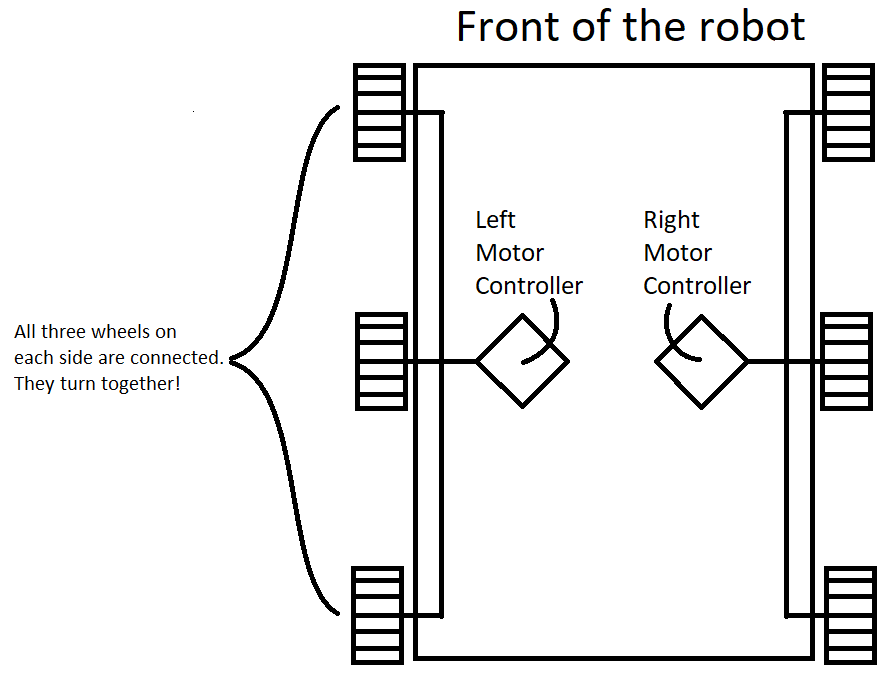
The robot you will be programming will have the following configuration (as viewed from above):
How do we make robots do things?
Robots are complicated, involving a lot of work in the Design, Mechanical, Electrical, and Computer aspects of engineering. As part of the programming team, we're responsible for this last part.
Since the robot is complicated, we use a well-known "architecture" (way of controlling a robot) that a lot of other teams use. Now's a great time to take a moment to read more about this Programming Robot Architecture before continuing. Go ahead, we'll wait.
When working on the curriculum, you'll only have to work with Subsystems and Commands. The test cases will run your Commands on your Subsystems.
There's one more important robot part that isn't really a part of the robot at all - the OperatorInterface. This is a fancy name for some joysticks and buttons connected to a laptop. Here is an example of a full driver station.
The OperatorInterface contains objects that represent all those joysticks and buttons and switches and such. If you want the robot to respond to human input, you need to use it in your code. In XbotEdu the OperatorInterface is simple - it holds a single gamepad (an Xbox-style controller), which has both of the sticks you need for tank drive.
What you'll be doing
There are 3 Java class files that you'll be interacting with:
- DriveSubsystem, which tells the robot how to actually move.
- TankDriveWithJoysticksCommand, which translates user input ("I want to turn left") into instructions that the DriveSubsystem can understand.
- TankDriveTest, which will test if your Command and Subsystem properly translate user input into robot action.
Let's take a look at these three classes in more detail.
DriveSubsystem
Open up the DriveSubsystem file in IntelliJ. (src/main/java/competition/subsystems/drive/DriveSubsystem.java)
It has two major sections. The first is where we declare what "things" this Subsystem is in control of. In this case, the Subsystem is responsible for two motors (referred to as XCANMotorController because they are motor controllers accessed via CAN):
    public final XCANMotorController frontLeft;
    public final XCANMotorController frontRight;
The second is the "constructor", where the Subsystem actually takes ownership of ports on the robot:
    @Inject
    public DriveSubsystem(XCANMotorController.XCANMotorControllerFactory motorControllerFactory,
                          ElectricalContract electricalContract, PropertyFactory pf) {
        log.info("Creating DriveSubsystem");
        // instantiate speed controllers and sensors here, save them as class members

        this.frontLeft = motorControllerFactory
                .create(new CANMotorControllerInfo("FrontLeft", 1), this.getPrefix(), "FrontLeft");
        this.frontRight = motorControllerFactory
                .create(new CANMotorControllerInfo("FrontRight", 2), this.getPrefix(), "FrontRight");

        pf.setPrefix(this);
        dp = pf.createPersistentProperty("DriveSubsystem", 1.5);
    }
The robot has a certain number of physical ports, and we can attach one motor to each. In the paint diagram above, you can see that the robot's front left motor is plugged into port #1. In the code, the frontLeft motor is created with new CANMotorControllerInfo("FrontLeft", 1) - that 1 is the same port #1. This is not a coincidence.
TankDriveWithJoysticksCommand
Open up the TankDriveWithJoysticksCommand file in IntelliJ: (src/main/java/competition/subsystems/drive/commands/TankDriveWithJoysticksCommand.java)
It has three major sections.
- What this Command has access to.
- What this Command will do the very first time it is called.
- What this Command will do about 50x a second until it is finished.
What this Command has access to
    @Inject
    public TankDriveWithJoysticksCommand(DriveSubsystem driveSubsystem, OperatorInterface oi) {
        drive = driveSubsystem;
        operatorInterface = oi;
        this.addRequirements(drive);
    }
This Command knows about two entities:
- DriveSubsystem: (we've covered this above)
- OperatorInterface: A class that has all the user input devices, like Joysticks and buttons.
What this Command will do the first time it is called
    @Override
    public void initialize() {
        // This code is run one time, right when the command is started.
        // You don't need to write any code here for this exercise.
    }
Right now, this is empty - so when this Command is called for the first time, it will just do nothing.
What this command will do about 50x a second until it is finished
    @Override
    public void execute() {
        // You need to get values from the joysticks and pass them into the motors.

        // Get values from the joysticks:
        // Here's how to get how far the left joystick's Y-axis is pushed:
        double leftValue = operatorInterface.gamepad.getLeftVector().getY();
        // TODO: get how far the RIGHT joystick's Y-axis is pushed as well

        // Pass values into the DriveSubsystem so it can control motors:
        // right now, this just sends the left power to the left part of the drive.
        // You'll need to give it a right power value as well.
        drive.tankDrive(leftValue, 0);
    }
Execute: what the robot does about 50 times a second (once every 20 milliseconds) until it is told to stop. This is where you translate user input (via joysticks and buttons) into instructions for the DriveSubsystem. The left side is done for you; follow the TODO comments to finish the right side.
TankDriveTest
Open up the TankDriveTest file in IntelliJ. (src/test/java/competition/subsystems/drive/TankDriveTest.java)
This file contains a few simple tests of your code. It will send inputs into the TankDriveWithJoysticksCommand (by manipulating fake joysticks) and call Initialize and Execute. Then it will read the output of the fake motors in the DriveSubsystem to see if they are moving in the expected way.
You won't need to modify any of the code in here, but you should know how to run the tests. There are a number of ways to do that, but an easy way is as follows:
- Have the file open.
- There will be an icon to the left of
public voidwith a green arrow. Click it and select Run Test from the menu. - If the output hasn't popped up, click the icon that looks like a Play button in the left rail of IntelliJ.
These tests will not pass initially. It is your job to modify both TankDriveWithJoysticksCommand and DriveSubsystem to make the tests pass.
Implement tank drive
Now it’s time to start writing some Java code to make your new tank drive project actually do something. If you get really stuck, take a look at this page: Tank Drive Solution.
The DriveSubsystem needs to know how to drive like a tank. You'll need to fill in code for the method "tankDrive" so that it takes in two values (how much left power, and how much right power) and tells the motors what to do based on it. We've given you a working solution for the left-side but you'll need to make it also work for the right. Some useful tips:
- Motors can be told to spin by calling setPower(double value). An example would be: "frontLeft.setPower(0.5)". This would set the front left motor to run at 50% power.
- The minimum value (full reverse) is -1. The maximum value (full forward) is 1. 0 means "stop."
The TankDriveWithJoysticksCommand needs to get values from the human and then tell the DriveSubsystem what to do. Some useful tips:
- The fake human in the test uses the left and right sticks on the
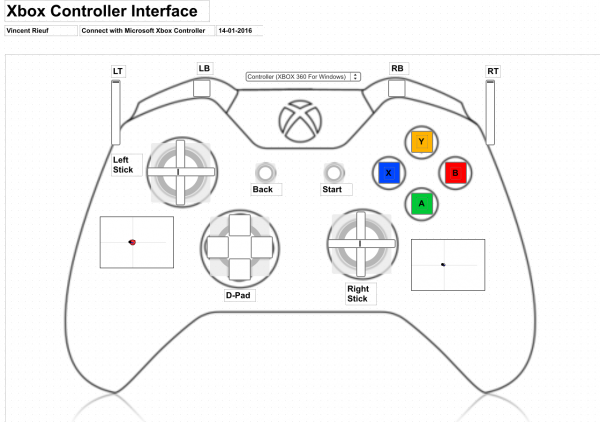
gamepadin the OperatorInterface. You read them withoperatorInterface.gamepad.getLeftVector().getY()andoperatorInterface.gamepad.getRightVector().getY(). - Each stick has an X axis and a Y axis. For tank drive you only need the Y (vertical) axis of each stick:
- When the fake human presses forward on the joystick, they expect the robot to go forward.
- The maximum value for a joystick axis is +1, and the minimum value is -1, with 0 being "not pushed along this axis."
Driving a simulated Robot
We have a robot simulator that lets us test out robot code without physically having a robot. This is very helpful because we often have to share access to the competition robot among many teams and people. The simulator lets anyone on the programming team try out their code and try and find problems with it there.
This is the first time you'll use it, so follow Running the Simulator from the top. You'll come back to that page in later challenges too.
You'll need a gamepad
Tank drive uses both sticks, and the keyboard fallback only has one, so ask for a gamepad if you don't have one.
Once the robot is on screen, drive it around the field using the tank drive control scheme to get a feel for it. Does pushing both sticks forward go straight? Does pushing them in opposite directions spin the robot in place?
Saving your code
Now that we have some new code created, we want to check it into the git repository and push it up to the central server. This way, if you ever use a different laptop you can keep working on the same code! Or if you make a mistake you can go back in time to a previous version of the code.
- Open 'GitHub Desktop'
- Click on 'Branch' on the top bar and 'New Branch...'
- This will create a new branch for you to work on that won’t affect anyone else. Name your branch something useful like 'tankdrive'
- In the rail on the left, enter a commit message. Give a useful message such as 'Initial changes to Tank Drive.'
- Once your message is typed, click 'Commit to {branch name}' and then 'Publish Branch' from the main section of the window. This will push up the new branch you created to the main github repository so you could 'pull' the changes back down on another machine.
Check your understanding
With this quick quiz
Extra Learning
Deploying code to the Robot
Once you’re ready to test your code on a real robot (and you have access to a real robot), follow these steps:
- Make sure the robot is on!
- Connect your laptop to the robot's wifi network: usually ‘488’
- Run 'FRC Driver Station'. This should have been installed when you installed the FRC Game Tools during onboarding (if you did the full onboarding).
- Deploy the project by selecting the 'Build & Deploy Robot' launch configuration in the top-right corner of IntelliJ, then clicking the green play triangle beside it.
- Deployment should take less than a minute. Afterwards, the driver station should report that the robot has code on it! Yay!
Testing tank drive on the real robot
- Place robot on top of blocks (so the wheels aren't touching the ground)
- Enable robot using the FRC Driver Station
- Place a finger on enter, so that you are able to stop the robot if things goes wrong (pressing enter while the robot is enabled will immediately disable it)
- Test driving using joysticks (move each joystick one at a time forward/backwards a little and make sure the all the wheels move as you would expect). It’s very common for certain motors to be backwards from what you expected and you need to adjust the program to handle it.
Next Steps
Continue with the next curriculum challenge: Altering Tank Drive