
Rotating to a Target Orientation
In this challenge we're going to rotate the robot to a target orientation. This is a very common thing we need to do autonomously during competition, for example to point at a goal to shoot balls into it.
REMINDER Don't forget to make a new branch! Get into the habit of doing this at the start of each new feature.
Our orientation system
Read this to understand how we define rotation: Frames of reference
You'll need to know this to complete this challenge.
Graphical Tests
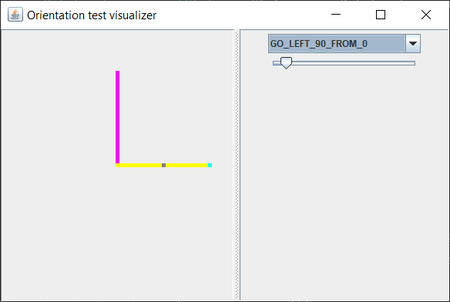
Like the previous challenge, we have a nice visualizer that's easier to read/understand than reading hundreds of log statements.
You can visualize the rotation of the virtual robot as your code is running using the visualization utility. To run it on IntelliJ, find the "RotationTestVisualizer" run configuration at the top of the window, and run it. When the window opens, select the test you are working on to start the simulation.
- The magenta line represents the goal orientation.
- A second line represents your robot's current orientation. Its color tells you how you're doing:
- Black: not at the goal yet, and your command is still running.
- Yellow: partway there - either your heading or your rotational speed is in range, but not both.
- Blue: at the goal (both heading and speed), but your command hasn't reported
isFinished()yet. - Green: at the goal and your command has finished. This is what you're aiming for!
- Red: your command said it was finished, but the robot isn't actually at the goal. This will fail the test.
- The gray bar across the middle of the orientation line represents your robot's current rotational speed.
- The cyan bar at the outer end of the orientation line represents your robot's current rotational power.
Note - your robot may not necessarily start at 0 degrees! The tests start you at 0, -90, -150, and 150 degrees. =]
Part1: Turning 90 degrees
The goal is to write a command that will rotate the robot 90 degrees to the left as quickly as possible, and then end.
- Command:
src\main\java\competition\subsystems\drive\commands\TurnLeft90DegreesCommand.java - Unit test:
src\test\java\xbot\edubot\rotation\TurnLeft90DegreesCommandTest.java - Visualizer Test:
src\test\java\xbot\edubot\rotation\RotationTestVisualizer.java
Hint: You will need to use getCurrentHeading().getDegrees() on the PoseSubsystem to figure out where you are pointing.
Hint: The pose.getCurrentHeading().getDegrees() is relative to the field and returns a value from -180 to 180 degrees.
Real World: A real robot's absolute heading is not known with absolute certainty and the value relative to the field degrades with time.
Part 2: Turning to an arbitrary orientation
Now that you have your basic 90 degree turn working, we're going to expand upon that with a more complicated command that will rotate the robot to an arbitrary heading, starting from any arbitrary heading - and do it as fast as possible!
This will involve handling some trickier cases with respect to angles around a circle.
- Command:
src\main\java\competition\subsystems\drive\commands\DriveToOrientationCommand.java - Unit test:
src\test\java\xbot\edubot\rotation\DriveToOrientationTest.java
Hint: The test calls setTargetHeading() to tell your command where to point, so you'll need to fill that method in too - right now it ignores the value it is given.
Hint: Unlike TurnLeft90DegreesCommand, this command doesn't have the PoseSubsystem yet - its constructor only takes the DriveSubsystem. Add PoseSubsystem pose as a constructor parameter (and save it to a field) so you can read the current heading.
Now you should be able to get the tests in both TurnLeft90DegreesCommandTest and DriveToOrientationTest to pass, since you have both TurnLeft90DegreesCommand and DriveToOrientationCommand written.
Next steps
Now that you have a good foundation with writing individual commands, let's learn about combining them with CommandGroups